Application of Arduino and ultrasonic sensor
The HCSR04 or the ultrasonic sensor is being used in a wide range of electronics projects for creating obstacle detection and distance measuring applications as well as various other applications. Here we have brought the simple method to measure the distance with Arduino and ultrasonic sensor.
The following things are needed to measure the distance:
- Arduino board
- Ultrasonic sensor
- Breadboard
- Connecting wires
- LED

Step 1
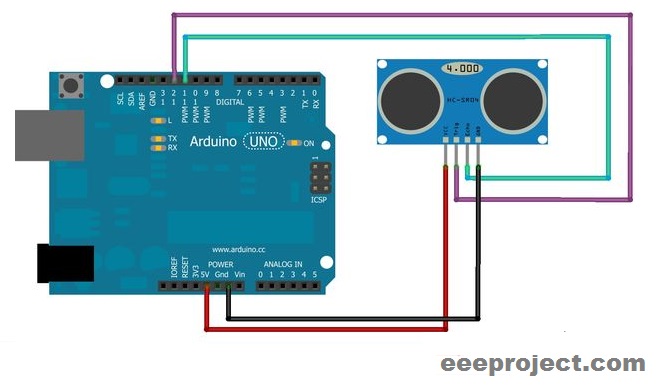
Begin the connections by inserting the ultrasonic sensor to the breadboard and connecting the Vcc power lines and ground to the Arduino +5v Vcc supply and ground respectively. The remaining pins are Trigger and Echo, connect the trigger pin to the Arduino 12 pin and Echo to the Arduino 11 pin as per the Arduino program prepared.
Step 2
The ultrasonic sensor and the arduino board is configured perfectly. Now the 9 pin of arduino is connected to the LED positive and the negative terminal to the ground of the arduino board.
Step 3
The connection part is done and now the arduino is connected to the pc in order to upload the arduino program in it using the cable
Program to measure distance using Arduino and ultrasonic sensor
int trigPin = 12; //triggor pin
int echoPin = 11; // echo pin
long timeperiod, cm, inches;


void setup()
{
Serial.begin(9600); //serial port communication
pinMode(trigPin, OUTPUT); // defining pinmode for trig
pinMode(echoPin, INPUT);  // defining pinmode for echo pin
}

void loop()
{
digitalWrite(trigPin, LOW);// sending 10 us pulse
delayMicroseconds(2);
digitalWrite(trigPin, HIGH);
delayMicroseconds(10);
digitalWrite(trigPin, LOW);
timeperiod = pulseIn(echoPin, HIGH);  // integrating pulse
inches = microsecondsToInches(timeperiod);
cm = microsecondsToCentimeters(timeperiod);
Serial.print("distcance in inches=");
Serial.print(inches);
Serial.print("   distance in centimeters=");
Serial.print(cm);
Serial.println();
delay(10);
}

long microsecondsToInches(long microseconds)
{
return microseconds / 74 / 2;
}

long microsecondsToCentimeters(long microseconds)
{
return microseconds / 29 / 2;
}
You can download the above program.

The ultrasonic sensor sends the ultrasound wave and if any object is being detected, it will receive the ultrasound back and process the signal according to our program. The data can be converted into centimeters as well as inches. When the distance between ultrasonic sensor and the object is less, the brightness value will be low and vice versa for if the distance is more.
Now if you liked the article feel free to share it with your friends on social media.
Also, if you have a question or doubt, feel free to ask them in the comment down below.
You may also like How to make motion detector using Arduino.

5 thoughts on “Distance measurement with arduino and ultrasonic sensor”
well it seems to me much simple than it really is ! do appreciate your effort though
Thanks ! Stay tuned 🙂
how to make PWM signal in an arduino ?
i want to make a distance measurement using ultrasonic sensor and 8051 microcontroller
hi, is it possible to use the LEDs in such a way that the different led glows on with respect to the distance of the object ? If it is possible can you help me out with the codes?